Setting up Point-to-Site OpenVPN on Microsoft Azure

Microsoft Azure has some nice paid services for creating site-to-site VPN. Using these, you can create a hybrid cloud that connects your enterprise network to a Virtual Network on Azure. But if you just want connect to a single Azure VM, this may be overkill.
This article discusses how to use OpenVPN to connect a Windows client on your local network to a Linux VM running in Azure. We will be following the general outline found at the OpenVPN HOWTO. Our Azure VM is running Ubuntu 14.04LTS.
Add OpenVPN to the Network ACL
Go the the Virtual Machines tab in the Azure portal. Select the VM you want, and click on its Endpoints tab. At the bottom of the screen, click on ‘+ ADD’ to add a new endpoint for OpenVPN.
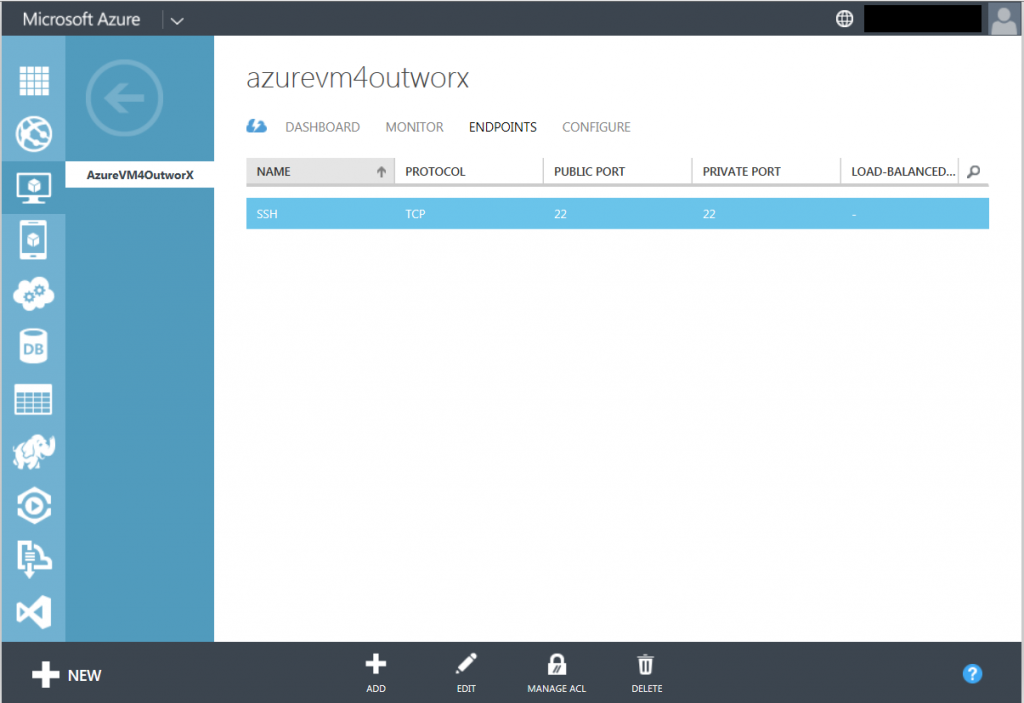
A small Wizard will pop-up to add the endpoint. Take the default setting to ‘Add a stand-alone endpoint’, and click the check mark to go to the next screen.

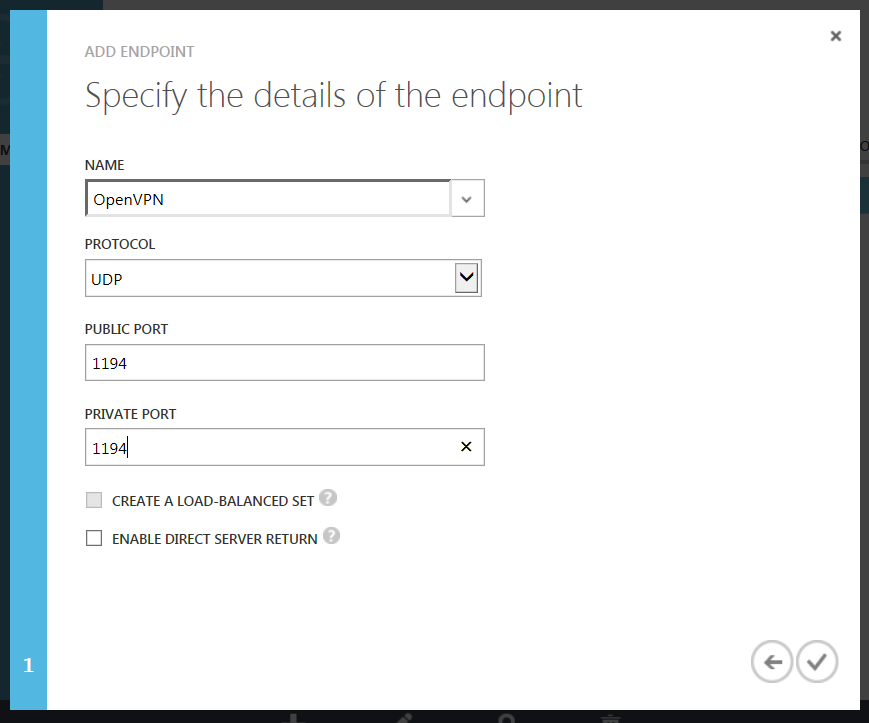
In the screen below, enter ‘OpenVPN’ in the pulldown. Set the protocol to UDP. OpenVPN’s official port number is 1194, so set both the public and the private ports to that. Click on the check mark to actually add the endpoint.
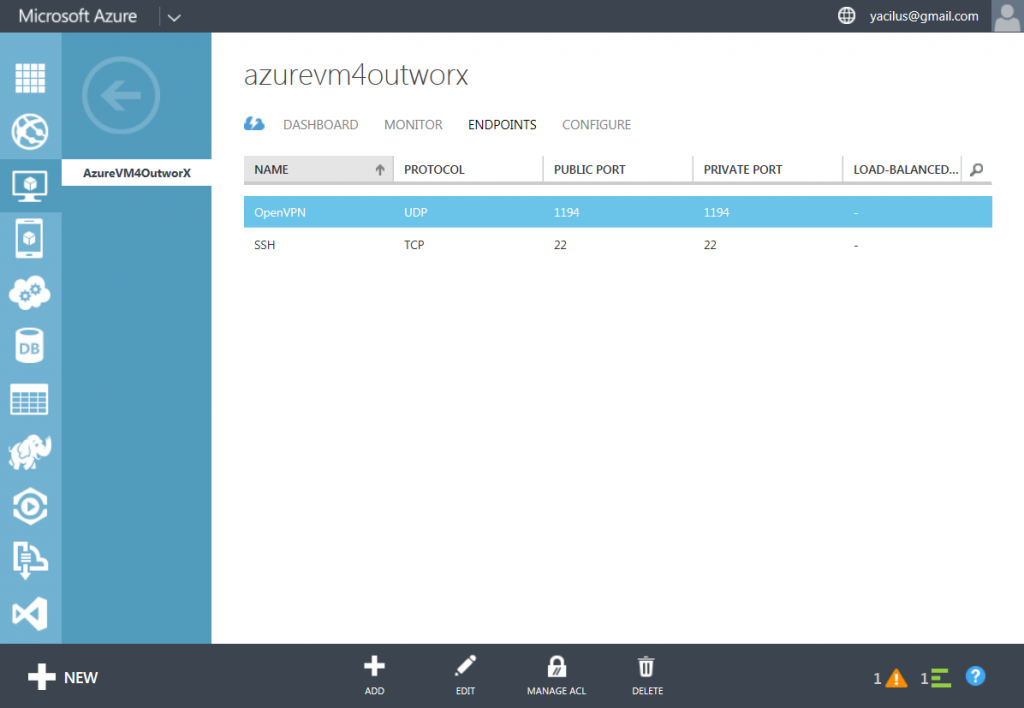
The Azure portal will take you back to Figure 1 while it works on changing its firewall rules for this VM to grant access on the specified port. Note that Azure merely configures its own networking, and does not alter any internal firewall rules in the VM. Azure will not change iptables for you. If you set-up a Linux firewall on your VM, you’ll need to change it yourself to let UDP port 1194 through. However, if you just booted a machine from the Microsoft Gallery, this should not be a problem. By default, iptables are not turned on on Gallery VMs.
Limiting Network Access
Next, you will almost certainly want to limit network access to this VM. Make sure that the OpenVPN endpoint is highlighted.
Now click on ‘Manage ACL’. Enter the external IP address that your company uses to access the Internet. Follow it with a ‘/32’ as shown below to indicate that access is only granted to this single IP address, and not a larger subnet.
If you have DSL and don’t know what that address is, go to someplace like whatismyipaddress.com. Low end DSL will often change the IP address when the router is rebooted. If that happens, you can just update the ACL.
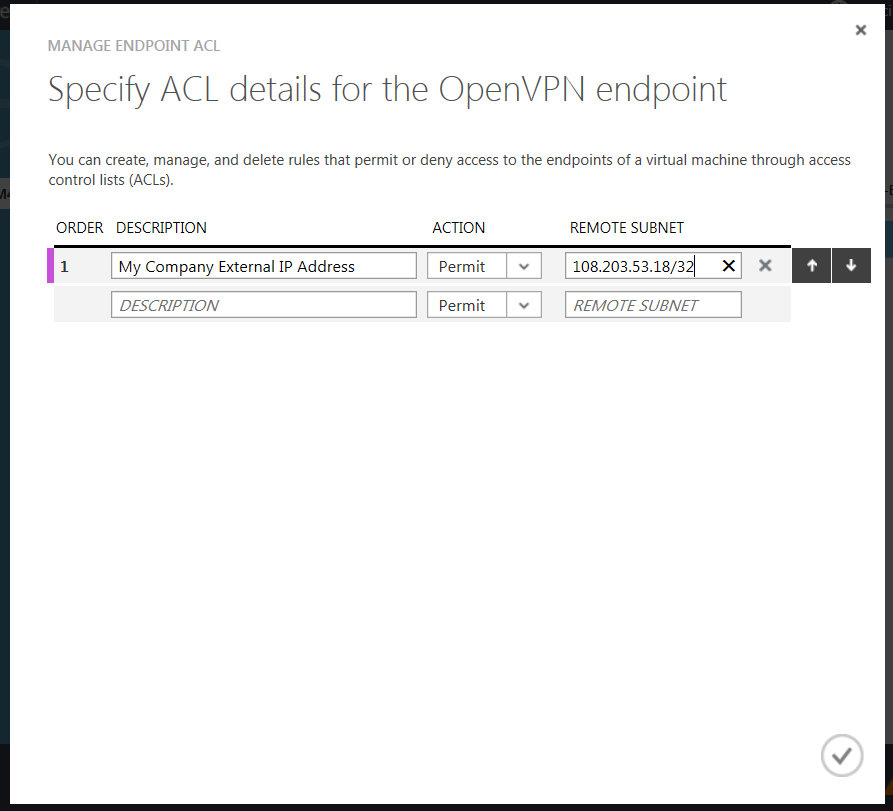
While you are there, limit access to ssh as well. Bots from China and other countries continually probe ssh and other ports trying to break in.
Configuring the Linux VM Server
The VM will be the OpenVPN server. To start the configuration process, we need to install some software on it.
Install OpenVPN and Easy RSA
Logon to your VM, and install OpenVPN and Easy RSA. Our VM is running Ubuntu 14.04LTS, so it can easily be installed with the simple command
$sudo apt-get install openvpn easy-rsa
The simplest way to set-up OpenVPN is to use a Static Key. This will give you exactly one client and one server. If that is fine with you, you can follow these instruction. We will set-up things with PKI certificates so that multiple clients can connect to the VM.
Set Up Easy RSA
Now set-up the Easy RSA environment under /etc/openvpn on the VM. Run the following commands:
 $ cd /etc/openvpn
 $ sudo mkdir easy-rsa
 $ cd easy-rsa
 $ sudo make-cadir my_ca
 $ sudo bash
 # cd my_ca
Now we need to edit the vars file, and make sure that the following variables are set:
- KEY_COUNTRY
- KEY_PROVINCE
- KEY_CITY
- KEY_ORG
- KEY_EMAIL
# vi vars
Set them to appropriate values, and make sure that none of them are blank. For example, here are the values we set for OutworX:
# These are the default values for fields
# which will be placed in the certificate.
# Don't leave any of these fields blank.
export KEY_COUNTRY="US"
export KEY_PROVINCE="CA"
export KEY_CITY="SantaClear"
export KEY_ORG="OutworX"
export KEY_EMAIL="info@outworx.com"
export KEY_OU="R&D"
Initialize Easy RSA’s Public Key Infrastructure (PKI)
Execute the following commands to initialize the Easy RSA environment, and to create a ROOT Certificate Authority. When build-ca offers you options, just press return to accept each one.
# cd /etc/openvpn/easy-rsa/my_ca
# . ./vars
# . ./clean-all
# . ./build-ca
Create the Server’s Certificate and Key
We can create the server’s certificate and key with the command below. It will prompt you for various values. You need to pay special attention to three of the prompts.
- For the ‘Common Name’, just accept the default value of ‘server’.
- When it asks something like, “Certificate is to be certified until Aug 2 01:35:29 2024 GMT (3650 days) Sign the certificate? “, you must enter ‘y‘.
- When it asks, “1 out of 1 certificate requests certified, commit? “, you must enter ‘y‘.
Also, when it asks you if you want to set a passphrase for the server key, just press return without entering a passphrase. If you enter a passphrase, then it will need to be entered each time the server starts.
# ./build-key-server server
Create the Client Certificate and Keys
To create a client certificate and keys, run the command below. Please note that you must type ‘y‘ in response to the following two questions:
- Sign the certificate?
- 1 out of 1 certificate requests certified, commit?
# ./build-key client1
If you want to create a certificate for a second client, simply change ‘client1’ to ‘client2’ in the command above.
Generate Diffie Hellmann Parameters
These are used by the server. Run the command below.
./build-dh
Move the CA and Server Info into /etc/openvpn
We next move the following PKI related files to /etc/openvpn:
- The Diffie-Hellman Parameters
- The Root Certificate Authority certificate
- The server certificate and private key
# cd /etc/openvpn/easy-rsa/my_ca/keys
# cp dh2048.pem ca.crt server.crt server.key /etc/openvpn
Configure the OpenVPN Configuration File
Copy the sample server config file to /etc/openvpn.
$ cd /usr/share/doc/openvpn/examples/sample-config-files
$ sudo cp server.conf.gz /etc/openvpn
$ cd /etc/openvpn
$ sudo gunzip server.conf.gz
Edit the server configuration file.
$ sudo vi server.conf
By default, the server.conf will use the 10.8.0.0/24 subnet for its connections. This subnet must not already been in use, either by the Azure VM or the networks accessed by your client. If it is, change the following section of server.conf to use a different subnet.
# Configure server mode and supply a VPN subnet
# for OpenVPN to draw client addresses from.
# The server will take 10.8.0.1 for itself,
# the rest will be made available to clients.
# Each client will be able to reach the server
# on 10.8.0.1. Comment this line out if you are
# ethernet bridging. See the man page for more info.
server 10.8.0.0 255.255.255.0
Make sure that the values for the Root Certificate Authority’s file and the server’s certificate and key match what you generated. If you followed the names in this blog, they already match the config file.
# Any X509 key management system can be used.
# OpenVPN can also use a PKCS #12 formatted key file
# (see "pkcs12" directive in man page).
ca ca.crt
cert server.crt
key server.key  # This file should be kept secret
The value for the Difflie Hellman file needs to change from ‘dh dh1024.pem’ to ‘dh dh2048.pem’
# Diffie hellman parameters.
# Generate your own with:
#   openssl dhparam -out dh1024.pem 1024
# Substitute 2048 for 1024 if you are using
# 2048 bit keys.
dh dh2048.pem
As an added security precaution, uncomment the lines ‘;user nobody’ and ‘;group nogroup’. This will drop the privilege of the OpenVPN daemon after startup.
# You can uncomment this out on
# non-Windows systems.
user nobody
group nogroup
Pushing a Route for DevStack
Normally, you only need to use the external DNS name of the VM to connect to it. So most people can skip this section. However, if your application makes use of the server’s internal IP address, then you’ll probably want to push a route to it. The route will tell the client how to get the server’s internal IP.
For example, DevStack normally configures itself using the server’s internal IP address. If you look in the Keystone service catalog of endpoints, you’ll see the internal IP address listed repeatedly. Since Keystone returns the service catalog to API users, all of those users will attempt to use the internal IP address.
The good news is that OpenVPN has facilities for automatically pushing routes to clients. The bad news is that the internal IP address will change every time you stop (deallocate) the Azure VM and then restart it. We will write a small script that will update the OpenVPN config file with the current internal IP address each time the system boots. The script was tested on Ubuntu 14.04LTS.
Take the following script, and place it in the file /usr/local/bin/openvpn-conf-update.sh. Make the script executable.
$ cd /usr/local/bin
$ sudo vi openvpn-conf-update.sh
$ sudo chmod 0755 openvpn-conf-update.sh
#!/bin/bash
#
# openvpn-conf-update.sh
#
# This script updates the OpenVPN configuration file /etc/conf/server.conf.
# The first IP address on any line with the ending comment
#       # AUTO-UPDATE-SERVER-IP
# will be updated to the current IPv4 address for eth0.
#
# Copyright 2014 OutworX
# Licensed under Apache 2. (//www.apache.org/licenses/LICENSE-2.0)
# This work is provided AS IS.


CONFIG="/etc/openvpn/server.conf"
IP4_REGEX="\(\([0-9][0-9]*\.\)\{3\}[0-9][0-9]*\)"

# Get the IP 4 address of eth0.
IPADDR="`ip -o -4 addr show eth0 | sed -n 's/.*eth0[ \t]*inet[ \t]*'\"${IP4_REGE
X}\"'.*/\1/p'`"

# If the IP address was 0.0.0.0, then treat it as if we did not get an
# IP address
if [[ "$IPADDR" = "0.0.0.0"  ]]
then
        IPADDR=""
fi

# If this server has an IP address on eth0 and the config file exists..
if [[ -n "$IPADDR"  && -f "$CONFIG" ]]
then
        # Then update the first IP address we find on the line with a comment
        # that says '# AUTO-UPDATE-SERVER-IP'
        sed -i "/#[ /t]*AUTO-UPDATE-SERVER-IP/s/${IP4_REGEX}/${IPADDR}/" $CONFIG
fi

exit 0
Next add the following lines to /etc/default/openvpn to invoke the script during OpenVPN startup.
$ cd /etc/default
$ sudo vi openvpn
# This is the configuration file for /etc/init.d/openvpn

# If vpn is starting up, then update the configuration file with the
# servers IP address on eth0.
if [ "$1" = "start" ]
then
        /usr/local/bin/openvpn-conf-update.sh
fi
The added lines are shown in blue.
Finally, edit the OpenVPN config file.
$ cd /etc/openvpn/ $ sudo vi server.conf
Search for the word ‘push’.
# Push routes to the client to allow it
# to reach other private subnets behind
# the server.  Remember that these
# private subnets will also need
# to know to route the OpenVPN client
# address pool (10.8.0.0/255.255.255.0)
# back to the OpenVPN server.
;push "route 192.168.10.0 255.255.255.0"
;push "route 192.168.20.0 255.255.255.0"
Add the following text with server_internal_ip_address replaced by your internal IP address.
push "server_internal_ip_address 255.255.255.255" # AUTO-UPDATE-SERVER-IP
The comment ‘# AUTO-UPDATE-SERVER-IP’ at the end of the line if very important. The openvpn-conf-update.sh script searches for lines with that comment. When it finds such a line, it updates the first IP address on that line with the current IP address.
If you are not sure what your internal IP address is, do a
$ ip addr show dev eth0
Here is a sample of the push directive in a server.conf file. The added lines are in blue.
# Push routes to the client to allow it
# to reach other private subnets behind
# the server.  Remember that these
# private subnets will also need
# to know to route the OpenVPN client
# address pool (10.8.0.0/255.255.255.0)
# back to the OpenVPN server.
;push "route 192.168.10.0 255.255.255.0"
;push "route 192.168.20.0 255.255.255.0"

# We have changed /etc/default/openvpn so it will update a push statement
# that has the comment AUTO-UPDATE-SERVER-IP on the same line.
#
push "route 100.79.146.52 255.255.255.255"      # AUTO-UPDATE-SERVER-IP
Now every time the system boots, the internal IP address in the push directive will be updated.
The server side configuration is now complete.
Configuring a Windows Client
Getting the Windows Client
You can get the Windows OpenVPN client here.
Copy the Root Certificate Authority file and the Client Files to Windows
The client Windows system will need the following three PKI files:
- The Root Certificate Authority certificate
- The client certificate
- The client private key
These were previously generated by Easy RSA on the Linux server. On the Linux server, copy these files to a Downloads directory in your home directory to make them easier to access when we copy them.
$ mkdir -m 0700 ~/Downloads
$ cd ~/Downloads
$ sudo cp /etc/openvpn/easy-rsa/my_ca/keys/ca.crt .
$ sudo cp /etc/openvpn/easy-rsa/my_ca/keys/client1.crt .
$ sudo cp /etc/openvpn/easy-rsa/my_ca/keys/client1.key .
$ sudo chown $USER *
Now download the PKI files. We will download them to the Windows Download folder. If you have PuTTY installed, you can copy the files with pscp. The syntax to copy files from the remote system to the local one is
C:\> pscp remoteuser@remotehost:file localfile
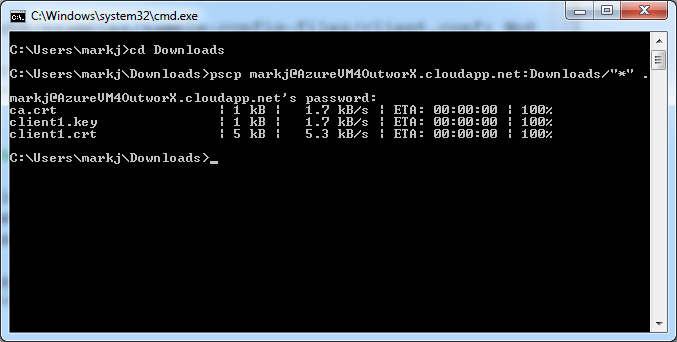
You can now use Windows Explorer to copy the CA and client certificates and the client key to C:\Program Files\OpenVPN\config. After you do this, your folder should look something like the following:

The Linux server has a sample client configuration file that we will use on the Windows client. We will use a sed command on the Linux server to do the following four things:
- Copy the client file to our Linux home directory.
- Change the name of the the base filename to servername. We name the file after the server since that will help the Windows client keep track of which config file belongs to which remote server.
- Add a filename extension of “.ovpn”. Windows OpenVPN expects its config files to have this extension.
- Change the line endings on the file from the Linux line endings (“\n”) to DOS line endings (“\r\n”)
$ sed 's/$/\r/' /usr/share/doc/openvpn/examples/sample-config-files/client.conf > ~/AzureVM4OutworX.ovpn
We will now use pscp on the Window’s client to download the configuration file into our Windows Download directory.
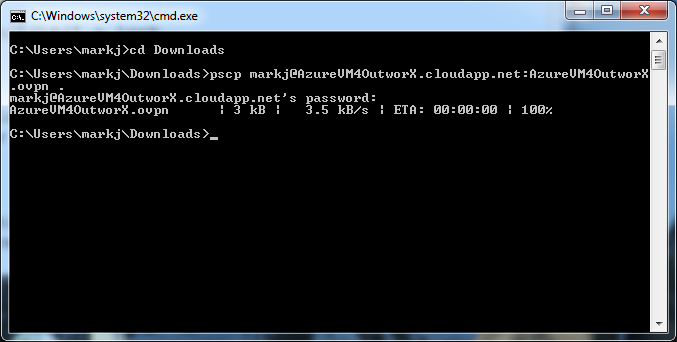
Double click on the config file we just downloaded to start Notepad on it. Change the line ‘remote my-server-1 1194’ to use the Linux server’s Fully Qualified Domain Name. For example,
# The hostname/IP and port of the server.
# You can have multiple remote entries
# to load balance between the servers.
remote AzureVM4OutworX.cloudapp.net 1194
;remote my-server-2 1194
In the section on SSL/TLS parameters, the parameters ca, cert, and key point to files for the Root Certificate Authority certificate, the client certificate and the client key.
# SSL/TLS parms.
# See the server config file for more
# description.  It's best to use
# a separate .crt/.key file pair
# for each client.  A single ca
# file can be used for all clients.
ca ca.crt
cert client1.crt
key client1.key
The OpenVPN HOWTO also mentions that you should check the server and client config files have the same values for dev, proto, and (if used) comp-lzo and fragment. These values should already be the same.
As a final step, copy the modified config file to C:\Program Files\OpenVPN\config.
The Windows client configuration is now complete.
Start the OpenVPN GUI
To start the OpenVPN GUI, right click on its icon and select ‘Run as administrator’. OpenVPN will need to modify routes if the server pushes them to it, so Admin privileges are needed.

A small taskbar icon similar to the one below will appear at the bottom of the screen.
Right click on it, and select Connect in the pop-up menu. Your VPN connection should be established.
